Created by Markus Enzweiler, you can download Starstax here. It’s available for free for Mac OS X, Windows and Linux. [ExpertPhotography is supported by readers. Product links on ExpertPhotography are referral links. If you use one of these and buy something, we make a little bit of money. Need more info? See how it all works here.]
Why Use StarStax?
You can create star trails in Photoshop, too. Or maybe you want to use Lightroom. So why do you have to use a specific software for your star trails? The simple answer is that night photography is tricky. It involves taking calibration files and multiple images to stack together later on. This improves the image quality and the amount of data you can reveal with histogram stretching and other advanced editing techniques. For star trails, in the era of digital sensor, it is best to take a big number of rather short exposures. Don’t take a single hours-long exposure. This means that you have to combine tens, if not hundreds, of images. Lightroom can’t do that. When it comes to Photoshop and similar software (Gimp, Affinity Photo, etc.), you can create star trails. But you have to load every image as a layer in the same document. Then manually subtract dark files from your images, and so on. StarStax is nowhere near that complicated.
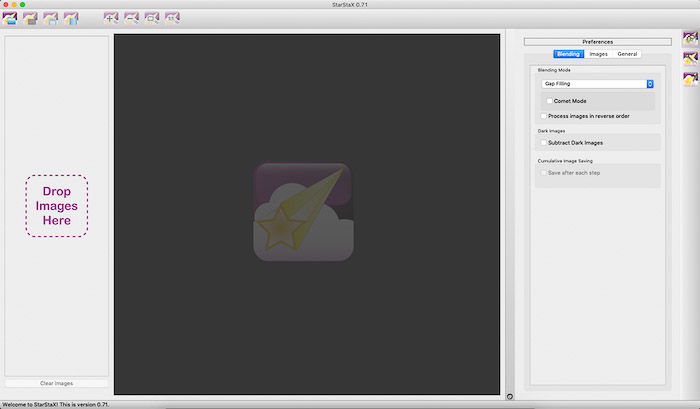
The StarStax User Interface
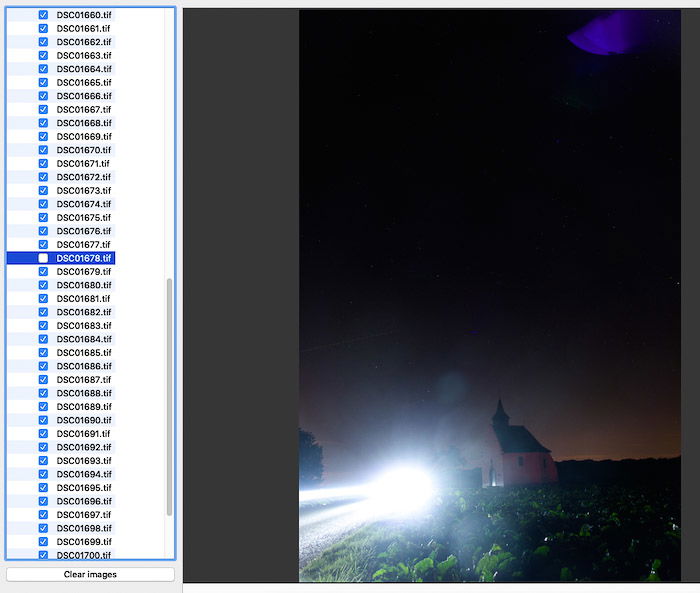
A lot of photographic software out there has complex and cluttered interfaces. Sliders, tools, layers, menus within menus, and so on. In comparison, StarStax has a very simple interface. Check out the image below for details. You can find a set of icons on the top tool bar. These allow you to load your images, load dark calibration files, save the final image, and process the images. You can also find the zoom controls here. Below the top bar the interface is split in three main panels. On the left, you’ll find the list of images. The dark files are displayed centrally where images appear. And finally, you have a settings panel with different options for image combination on the right. There’s three more icons on the far right. From the top to bottom, they display the Preference Panel, the Tool Panel for the Gap Filling blending mode and a useful Help section.
Working With StarStax
1. How to Prepare Your Images
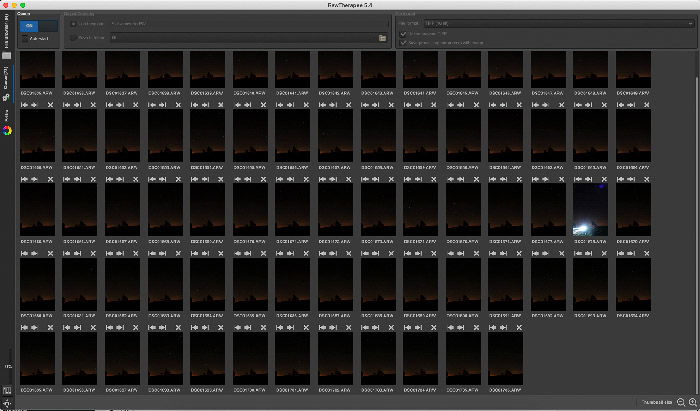
Before you start using this software, you should know that StarStax cannot read RAW files. Only JPG, PNG and TIFF images. You’ll need to use a Raw Converter, such as Adobe Camera Raw or RawTherapee (free and multiplatform). If you use Camera Raw, make sure you disable the Automatic Lens Correction first. More on why you should do that further down.
2. Loading Your Images and Culling
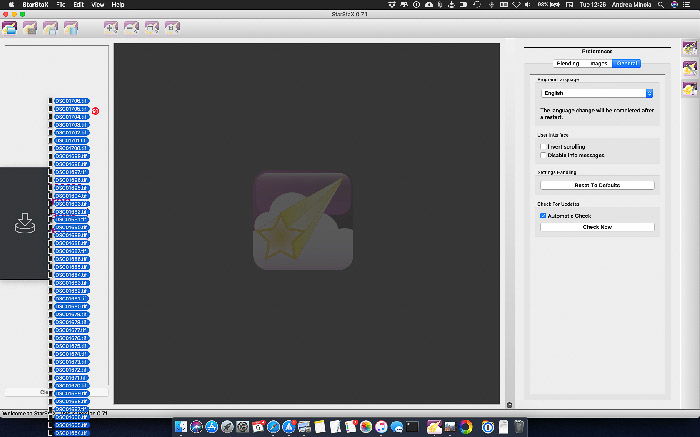
Once you have your images in a format that StarStax can read, it’s time to load them. Drag and drop all of them into the leftmost panel of the interface. Once the images are loaded, you can visualise them and deselect those that you don’t like. For example, if a passing car or plane ruined the exposure. Culling your images is fast and easy in StarStax. When you do long exposures, one way to handle thermal noise reduction and removing stuck pixels is to take the so called dark frames. Take some photos with the same settings and at the same temperature as your light frames, but keep the lens cap on. The dark frames will then be subtracted from your light ones to greatly improve image quality. If you took darks, add them by clicking on the icon in the tool bar. StarStax will then combine your dark and light frames without any further work from you.
3. Which Blending Mode to Choose
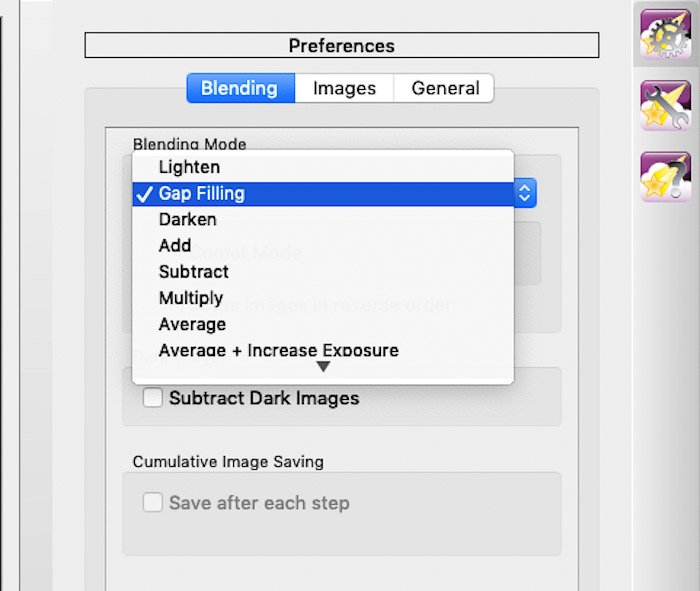
Star trails images are created by blending the images in Lighten or Gap Filling modes. Lucky for you, Starstax acts as a blending software thanks to its many blending modes. You can select the blending mode in the preference panel. The two modes work in similar ways. If the pixels of the selected image are lighter than the ones on the previous image in the stack, they are kept in the image. The opposite works for the Darken blend mode. If the pixels in the current image are darker, they are replaced with pixels from the previous image. Note that this behaviour is on a channel by channel basis. This rule is applied to each of the 3 RGB color channels separately. (photoblogstop.com) Simply put, these blending modes compare the images and choose the brightest pixel at each location. When taking multiple exposures to create your star trails, your camera will usually pause between consecutive exposures. This is usually a 1-second pause. Because of this, and depending on the focal length you use, you might notice small gaps in the resulting star trails. In that case, use the Gap Filling mode. And if you’re not sure, use it anyway. The other tabs in the preference panel will control how the image is displayed. You can also select the jpeg compression to use when saving the final results (Images tab). And more general behaviour of the software (General Tab).
4. Creating the Star Trails
Once you have selected the desired blending mode, you are ready to start processing the images to create the star trails. Click on the Start processing icon in the toolbar and see the star trails forming before your eyes in real time.
5. Working With the Gap Filling Blending Mode
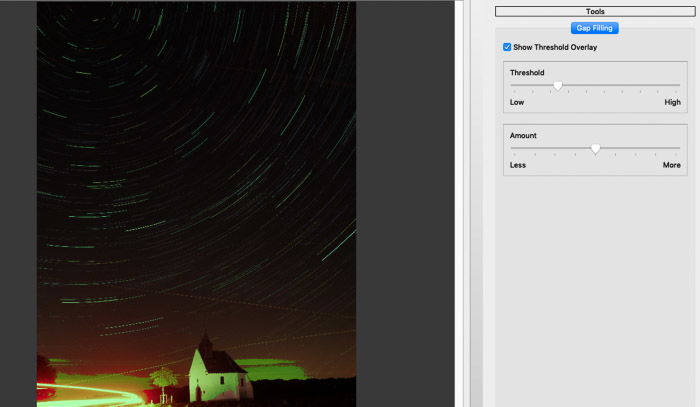
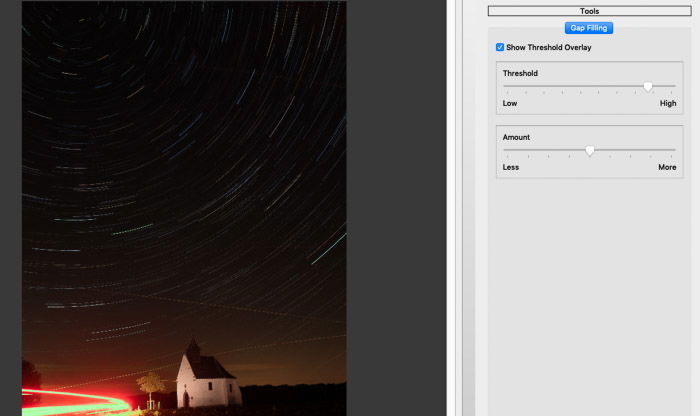
If you selected the Gap Filling blending mode, StarStax will direct you to the Gap Filling preference panel. There you will find two control sliders: Threshold and Amount. Threshold will select the the brightness of the pixels affected by the amount of gap filling. When you set the threshold you will see that the affected pixels will be temporarily displayed in green. You can check the Show Threshold Overlay option to show the selection permanently. A too low threshold will include the darker pixels of the sky or foreground. A too high threshold and you will select only the brightest pixels in the image. A good threshold is one that allows to select most of the brightest trails without spilling into the darker sky. Don’t worry if you are selecting pixels that are in the foreground. You can easily combine the star trails in the sky with a properly edited foreground later on. In Photoshop, for example. To set the amount of gap filling, magnify the image 100%. Keep an eye on how the trails smooth out when increasing the amount of Gap Filling. When you are happy with the result, save your image to apply the Gap Filling settings.
6. Saving Your Star Trails
You can rework your star trails within StarStax as many times as you want. Try different settings for the Gap Filling blending mode, add the comet effect, etc. When happy with the results, use the Save icon to save your final image. By default, the image is saved as jpg. Manually adding the extension .tiff to the file name, will force StarStax to save your image as 8-bit tiff. It’s not quite as powerful as 16-bit tiff. But it’s better then jpeg for further editing in, say, Adobe Lightroom and/or Adobe Photoshop.
Before You Go: Trouble Shooting
Working With the Foreground, the Average Blending Mode and 8-bit File Limitation
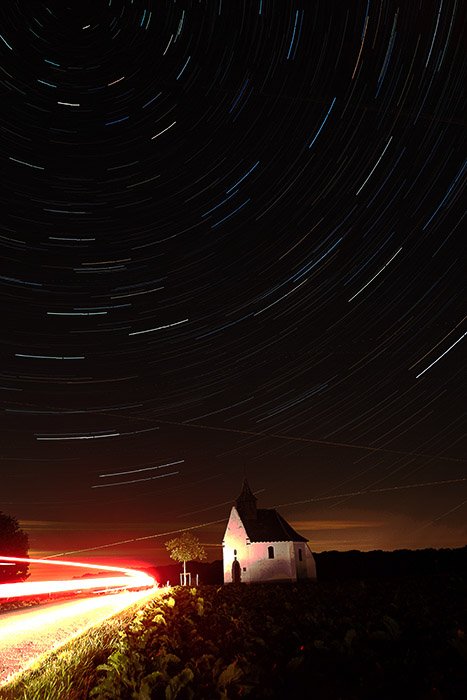
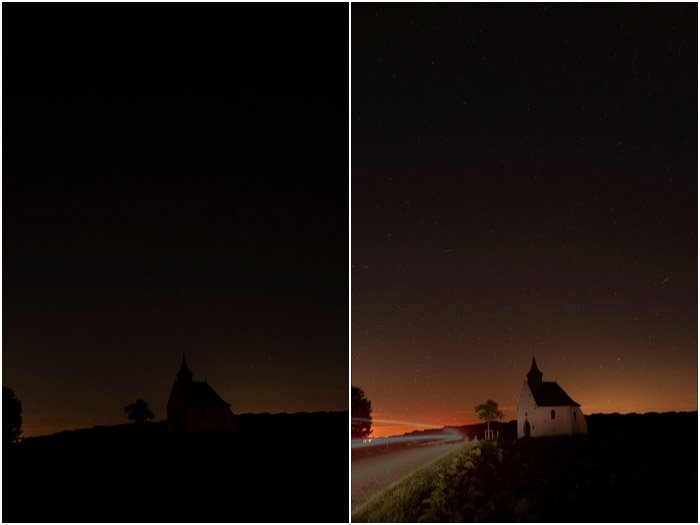
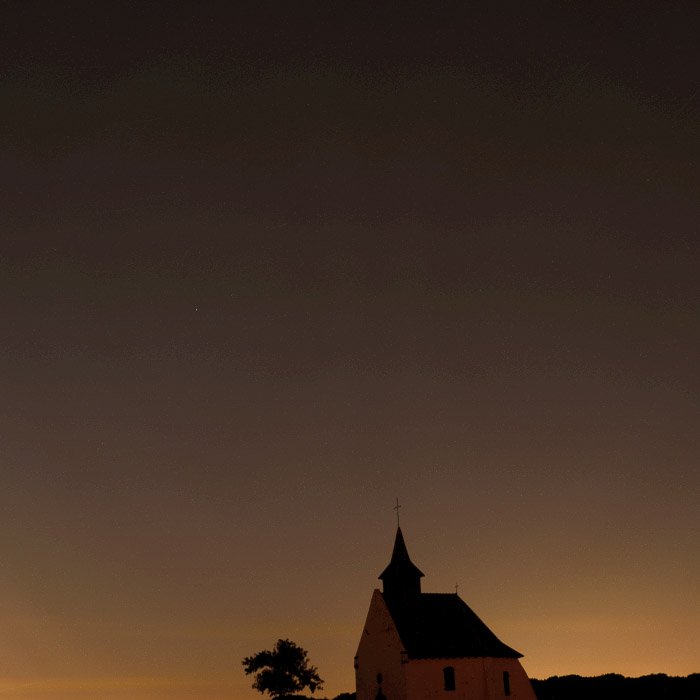
The Average Blending mode can be used to reduce the digital noise in the long exposures. This is a good way to have noise free foregrounds, particularly if nothing move during your star trail. The result of averaging all the images is that the resulting one, while cleaner, will be quite dark. In my image I lost the light trails from the passing cars and the chapel is not that visible. The trick is not to used too many frames for cleaning the foreground. I usually take 10-15 images for this. You can also use Average+Increasing Exposure to brighten up your averaged image to a specific EV number directly in StarStax. Be careful of posterization and banding, though. StarStax will save in jpeg or tiff formats, but the tiff will have only an 8-bit color depth. Posterization can be dealt with in Photoshop. Here is a nice tutorial on how to remove it. Or you can process your foreground in Photoshop starting from your raw files.
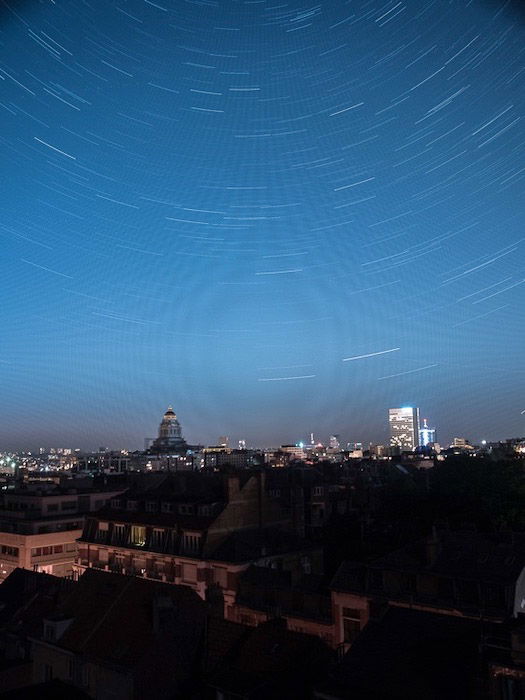
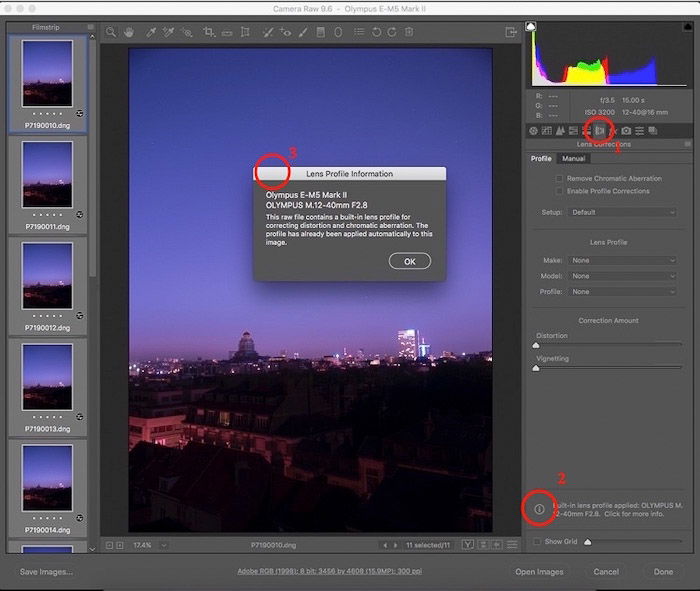
The Automatic Lens Correction Conundrum
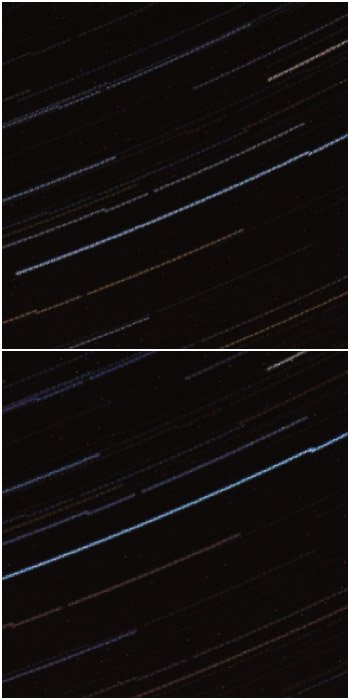
I brought up Automatic Lens Correction at the beginning of this article. And I told you to disable Automatic Lens Correction when converting raw files into TIFF ones. Automatic Lens Correction causes an unwanted pattern to show up in your final image. This happens when you use lighten blending mode, and a few other modes. It looks like this. To avoid the pattern, disable automatic lens correction. The main problem with this is for people taking star trails with compact and bridge cameras. But also for those working with micro four thirds, like me. If we use Adobe Camera Raw (ACR), automatic lens correction is applied by default and can’t be disabled. To know if this is the case for your images, go to the Lens correction tab in ACR. Click on the information balloon at the bottom of that panel. If that’s the case, give it a try anyway. But if a strange pattern shows up in the final image, the easiest solution is to ditch ACR for a software that does not apply the lens correction automatically. For example, RawTherapee. And that’s that. StarStax is a great software for creating star trails in an easy and fun way (it’s a free download too). Give it a try! And if you’re so inclined, share your results with us.
title: “Starstax Review And Beginner S Guide Star Trails Made Easy” ShowToc: true date: “2023-01-16” author: “Mary Singleton”
Created by Markus Enzweiler, you can download Starstax here. It’s available for free for Mac OS X, Windows and Linux. [ExpertPhotography is supported by readers. Product links on ExpertPhotography are referral links. If you use one of these and buy something, we make a little bit of money. Need more info? See how it all works here.]
Why Use StarStax?
You can create star trails in Photoshop, too. Or maybe you want to use Lightroom. So why do you have to use a specific software for your star trails? The simple answer is that night photography is tricky. It involves taking calibration files and multiple images to stack together later on. This improves the image quality and the amount of data you can reveal with histogram stretching and other advanced editing techniques. For star trails, in the era of digital sensor, it is best to take a big number of rather short exposures. Don’t take a single hours-long exposure. This means that you have to combine tens, if not hundreds, of images. Lightroom can’t do that. When it comes to Photoshop and similar software (Gimp, Affinity Photo, etc.), you can create star trails. But you have to load every image as a layer in the same document. Then manually subtract dark files from your images, and so on. StarStax is nowhere near that complicated.
The StarStax User Interface
A lot of photographic software out there has complex and cluttered interfaces. Sliders, tools, layers, menus within menus, and so on. In comparison, StarStax has a very simple interface. Check out the image below for details. You can find a set of icons on the top tool bar. These allow you to load your images, load dark calibration files, save the final image, and process the images. You can also find the zoom controls here. Below the top bar the interface is split in three main panels. On the left, you’ll find the list of images. The dark files are displayed centrally where images appear. And finally, you have a settings panel with different options for image combination on the right. There’s three more icons on the far right. From the top to bottom, they display the Preference Panel, the Tool Panel for the Gap Filling blending mode and a useful Help section.
Working With StarStax
1. How to Prepare Your Images
Before you start using this software, you should know that StarStax cannot read RAW files. Only JPG, PNG and TIFF images. You’ll need to use a Raw Converter, such as Adobe Camera Raw or RawTherapee (free and multiplatform). If you use Camera Raw, make sure you disable the Automatic Lens Correction first. More on why you should do that further down.
2. Loading Your Images and Culling
Once you have your images in a format that StarStax can read, it’s time to load them. Drag and drop all of them into the leftmost panel of the interface. Once the images are loaded, you can visualise them and deselect those that you don’t like. For example, if a passing car or plane ruined the exposure. Culling your images is fast and easy in StarStax. When you do long exposures, one way to handle thermal noise reduction and removing stuck pixels is to take the so called dark frames. Take some photos with the same settings and at the same temperature as your light frames, but keep the lens cap on. The dark frames will then be subtracted from your light ones to greatly improve image quality. If you took darks, add them by clicking on the icon in the tool bar. StarStax will then combine your dark and light frames without any further work from you.
3. Which Blending Mode to Choose
Star trails images are created by blending the images in Lighten or Gap Filling modes. Lucky for you, Starstax acts as a blending software thanks to its many blending modes. You can select the blending mode in the preference panel. The two modes work in similar ways. If the pixels of the selected image are lighter than the ones on the previous image in the stack, they are kept in the image. The opposite works for the Darken blend mode. If the pixels in the current image are darker, they are replaced with pixels from the previous image. Note that this behaviour is on a channel by channel basis. This rule is applied to each of the 3 RGB color channels separately. (photoblogstop.com) Simply put, these blending modes compare the images and choose the brightest pixel at each location. When taking multiple exposures to create your star trails, your camera will usually pause between consecutive exposures. This is usually a 1-second pause. Because of this, and depending on the focal length you use, you might notice small gaps in the resulting star trails. In that case, use the Gap Filling mode. And if you’re not sure, use it anyway. The other tabs in the preference panel will control how the image is displayed. You can also select the jpeg compression to use when saving the final results (Images tab). And more general behaviour of the software (General Tab).
4. Creating the Star Trails
Once you have selected the desired blending mode, you are ready to start processing the images to create the star trails. Click on the Start processing icon in the toolbar and see the star trails forming before your eyes in real time.
5. Working With the Gap Filling Blending Mode
If you selected the Gap Filling blending mode, StarStax will direct you to the Gap Filling preference panel. There you will find two control sliders: Threshold and Amount. Threshold will select the the brightness of the pixels affected by the amount of gap filling. When you set the threshold you will see that the affected pixels will be temporarily displayed in green. You can check the Show Threshold Overlay option to show the selection permanently. A too low threshold will include the darker pixels of the sky or foreground. A too high threshold and you will select only the brightest pixels in the image. A good threshold is one that allows to select most of the brightest trails without spilling into the darker sky. Don’t worry if you are selecting pixels that are in the foreground. You can easily combine the star trails in the sky with a properly edited foreground later on. In Photoshop, for example. To set the amount of gap filling, magnify the image 100%. Keep an eye on how the trails smooth out when increasing the amount of Gap Filling. When you are happy with the result, save your image to apply the Gap Filling settings.
6. Saving Your Star Trails
You can rework your star trails within StarStax as many times as you want. Try different settings for the Gap Filling blending mode, add the comet effect, etc. When happy with the results, use the Save icon to save your final image. By default, the image is saved as jpg. Manually adding the extension .tiff to the file name, will force StarStax to save your image as 8-bit tiff. It’s not quite as powerful as 16-bit tiff. But it’s better then jpeg for further editing in, say, Adobe Lightroom and/or Adobe Photoshop.
Before You Go: Trouble Shooting
Working With the Foreground, the Average Blending Mode and 8-bit File Limitation
The Average Blending mode can be used to reduce the digital noise in the long exposures. This is a good way to have noise free foregrounds, particularly if nothing move during your star trail. The result of averaging all the images is that the resulting one, while cleaner, will be quite dark. In my image I lost the light trails from the passing cars and the chapel is not that visible. The trick is not to used too many frames for cleaning the foreground. I usually take 10-15 images for this. You can also use Average+Increasing Exposure to brighten up your averaged image to a specific EV number directly in StarStax. Be careful of posterization and banding, though. StarStax will save in jpeg or tiff formats, but the tiff will have only an 8-bit color depth. Posterization can be dealt with in Photoshop. Here is a nice tutorial on how to remove it. Or you can process your foreground in Photoshop starting from your raw files.
The Automatic Lens Correction Conundrum
I brought up Automatic Lens Correction at the beginning of this article. And I told you to disable Automatic Lens Correction when converting raw files into TIFF ones. Automatic Lens Correction causes an unwanted pattern to show up in your final image. This happens when you use lighten blending mode, and a few other modes. It looks like this. To avoid the pattern, disable automatic lens correction. The main problem with this is for people taking star trails with compact and bridge cameras. But also for those working with micro four thirds, like me. If we use Adobe Camera Raw (ACR), automatic lens correction is applied by default and can’t be disabled. To know if this is the case for your images, go to the Lens correction tab in ACR. Click on the information balloon at the bottom of that panel. If that’s the case, give it a try anyway. But if a strange pattern shows up in the final image, the easiest solution is to ditch ACR for a software that does not apply the lens correction automatically. For example, RawTherapee. And that’s that. StarStax is a great software for creating star trails in an easy and fun way (it’s a free download too). Give it a try! And if you’re so inclined, share your results with us.
